Posts

Showing posts from November, 2010

Venus Astronaut wip2

Image
The helmet was supposed to look like a glass fish bowl, nice and simple. Yet, I couldn't resist trying out a couple ideas :)

Venus Astronaut wip

Image
I thought I'd do a character for the Venus Rocket...still in the early stages yet :) Two versions so far, but the second one looks more Steampunky than the first...Mmmmm

Helix Tutorial part2

Image
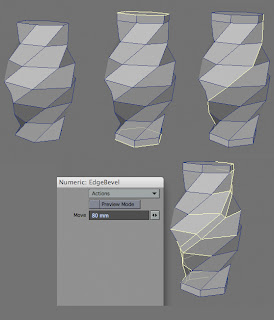
Here is part two of the helix tutorial with a different approach :) We start off with the base mesh from last time, select the end caps and bevel as shown. We do this, so the end polygons are more or less vertical. Select one Edge loop and use Edge Bevel , cut and paste the newly created polygons into a new layer. The distance between each pair of points will be different along the loop. Select two points around the center and use Absolute Measure tool, copy the distance to the clipboard. Paste the value into Thickener . We end up with a model, where each cross section looks the same, even if it still tapers off towards the ends. Use the Radial Array tool as we did in the last tutorial and you're done.

Venus Rocket Final

Image
After many test renders and tweaking surfaces, here's the final version. I couldn't settle with just one :)

Tapered Helix Tutorial

Image
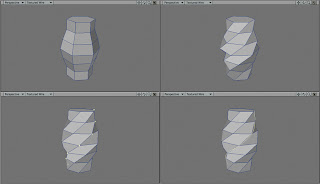
This little tutorial is in response to an interesting question on Newtek's forum, asking if there was a falloff option for Smooth Shift tool. The idea was to create a helix type object, that is thick in the center and tapers off...must be simple right?? Yes indeed :) First we need a spline curve: 1/ Create a cylinder and shape it as shown. I used a six sided disc, because the final helix will have six arms. 2/ From the top view, use the Twist tool to deform the shape. 3/ Select the points along one of the loops. 4/ Create an open curve , cut and paste it into a new layer. 5/ Create an additional disc and with the curve in the background use Rail Extrude . 6/ Now comes the fun part, select the center edge loop and activate the Move Plus tool. While active, right click the mouse button and drag. Select the edge loops on either side and do the same but not as much, repeat for the last two loops. 7/ Once you're happy with the model, use the Radial Array tool to compl...

Tribal Rocket

Image
What can I say...it's a bit scary and tribal at the same time...hehe.

Retro Rocket Vimeo

So here it is....the whole modelling process of the retro rocket. Including all the mistakes...should be fun to watch :)

Venus Rocket 2

Image
Haha...a touch of red does make things go faster.....cool :)

Retro Rocket Wip

Image
Part of the speed modelling challenge at Newtek, finished at about the 60 minute mark. Oh yes, I recorded the modelling session as well.....stay tuned :)

Venus Rocket 1

Image
Here's a textured version of the Venus Rocket. I think more surface experiments are in order, it's just so much fun.

Reject Rocket

Image
I thought I'd share an earlier version of the Venus rocket. I wasn't happy with it at the time, but now...it kinda has potential....Mmmmmmm :)

Venus Rocket Wip

Image
Just playing around in Lightwave, with no design in mind....as usual. I love designing as you model...because you just never know where you end up :) Oooooh...I just got an idea, this might make a great little tutorial....hehe.

Steampunk Pirate Raygun

Image
Another sketch edited in photoshop. These designs are on my to-do list, should be interesting to see how they look in 3d :)

Steampunk Deep Sea Sub

Image
Something I drew and then played around in Photoshop.

Tin Pirate Wip

Image
Ahoy, me Hearties! I almost forgot about this little character, it was hiding away in my HD. Now that I found him again, I'll have to finish him soon :)