Posts

Showing posts from August, 2010

Captain Nemo Tutorial :part 1

Image
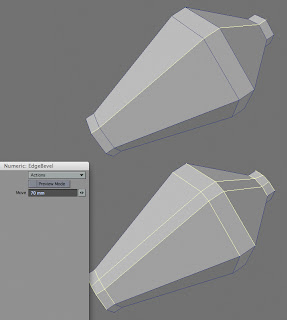
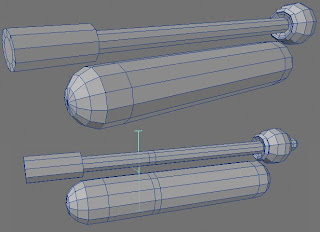
This is how I created the cage muzzle thingy for Captain Nemo weapon. I started off with a six sided cylinder and beveled the above basic shape. You could have just created the strip, but we are going to use parts of this geometry to create the rings that go around the muzzle. So...first of all, copy and paste the object onto a new layer. Since what we are going to do will render it useless later on, it's always best to work on a copy. Select the center top edge and Edge Bevel as shown. Copy this new strip onto a new layer. As you can see the Edge Bevel has moved points out of position...most tools will have some kind of side effect...you might decide to fix it or not, it's up to you. Select the four points that make up a polygon and with the Info Panel open, copy the Y position from # 3 point and then select all the points in the info panel and paste the value. Do the same for the points of the other two polygons. Looking from the back viewport, we can see that the edg...

Captain Nemo Tutorial :part 2

Image
Time to create those 8 figure rings...should be nice and quick :) Like the last tutorial, we'll use existing geometry to create new parts. Since we want the two rings to be the same width, use the Knife tool on a copy and cut as shown. Cut and paste the shapes into a new layer and use Thickener as shown...merge points afterwards. Select the four Polygons and Merge Polygons so we end up with two N-gons. The Bridge and PolySew_V3 tools don't work well with groups of polygons...so it best to create temporary n-gons. With these two n-gons selected, run either the Bridge tool or the PolySew_V3 tool. Booth do similar things, but when one fails the other usually doesn't. BandSaw the outside and inner loops and it's done, so simple :) You could copy the previous 8 figure ring and delete the parts you don't want...but we'll just do it one more time :) Cut the shape you want. Use Thickener Tool and merge points afterwards. There was a few different versions...

Captain Nemo's Weapon: wip

Image
Oooh...look, it's Captain Nemo's underwater rifle :) Modelling time 67 minutes.

Butteridge's Flying Machine: Wip

Image
I recently finished reading "The war in the air" by H.G. Wells, a great book. While searching for reference images, I came across the French version of the book and loved the design on the book cover. This is the result of 1.5 hours of mucking about :)

Steampunk: Gas Mask2 update

Image
Almost finished...I think :) I might add a leather/metal cap to protect the filters from dust storms and what not.....Mmmmmm.

Rust Scene eample

Image
I just got a private message asking about the Grit Node and my rust metal presets, the effect wasn't showing up in the renders. I do believe it has to do with object size and or grid scale in Layout. I have never gotten around to figuring it out for myself...I just load a scene with the effect I want (rust in this case) and then replace the old object with the new one and it works all the time. One of these days I'll take the time to learn, but for now...download this rust scene and have fun. Oh yes, once you have GritNode plugin loaded, you can find the node in the following location in the node editor: Add node/Additional/ee_GritNode

Steampunk Spider chair: wip

Image
I decided to turn the spider chair into a steampunk machine, the umbrella and the metal chimney were borrowed from the my flying machines :)

Steampunk: Gas Mask2 wip

Image
What's better than one steampunk gas mask? Two of course....some interesting shapes happening in this one :)

Bart Simpson Wip

Image
I found this off model of Bart Simpson on my hard drive, done years ago. It still needs fixing and tweaking etc...but....I just had to make a render or two :)

Police interceptor

Image
Police interceptor, with built in electromagnetic pulse weapon to stop the bad guys :)

Red Flame

Image
This the flying car I designed for the NVArt - Accelerate competition. It was fun and I got some nice models out of the event, even if they weren't in the style of Syd Mead :)