Captain Nemo Tutorial :part 1
This is how I created the cage muzzle thingy for Captain Nemo weapon.
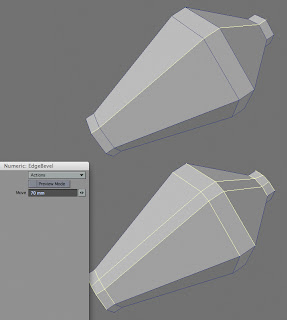 I started off with a six sided cylinder and beveled the above basic shape. You could have just created the strip, but we are going to use parts of this geometry to create the rings that go around the muzzle.
So...first of all, copy and paste the object onto a new layer. Since what we are going to do will render it useless later on, it's always best to work on a copy.
Select the center top edge and Edge Bevel as shown. Copy this new strip onto a new layer.
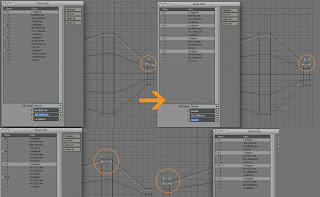 As you can see the Edge Bevel has moved points out of position...most tools will have some kind of side effect...you might decide to fix it or not, it's up to you.
Select the four points that make up a polygon and with the Info Panel open, copy the Y position from # 3 point and then select all the points in the info panel and paste the value. Do the same for the points of the other two polygons.
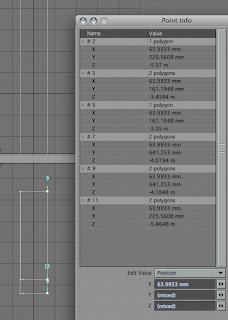 Looking from the back viewport, we can see that the edges aren't straight here as well. Do the same as before, but this time we are dealing with the X position.
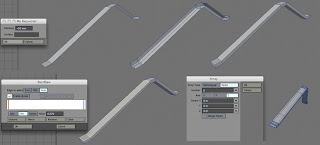 We want the current strip to be the top of the object, so we add a negative value in Thickener's requester panel. Flip and merge points, then BandSaw the object to get sharper edges. Once the object is ready, it's time to use the Radial Array tool as shown.
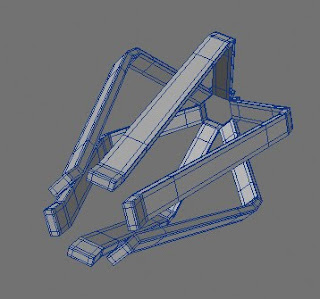 This is how it should be looking so far.
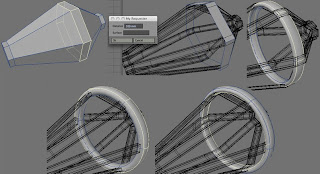 Going back to the original mesh, select the center ring, copy and paste onto to a new layer. Use the Thickener tool again. I'm using the default value, but we'll be resizing it in the next step.
This is the fun part, we'll use the Move Plus tool to do all the resizing. I love this tool and use it all the time. Select the outside loop and with Move Plus tool active, right click and drag until you're happy with the new size. Do the same to the inner loop, it might take a bit of fine tuning but once you get used to using this tool, you'll never look back :)
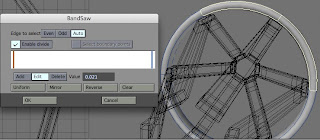 BandSaw the front and back of the ring and you're done.
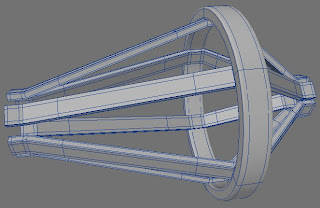 Repeat the process for the other the two smaller rings.
 I started off with a six sided cylinder and beveled the above basic shape. You could have just created the strip, but we are going to use parts of this geometry to create the rings that go around the muzzle.
So...first of all, copy and paste the object onto a new layer. Since what we are going to do will render it useless later on, it's always best to work on a copy.
Select the center top edge and Edge Bevel as shown. Copy this new strip onto a new layer.
 As you can see the Edge Bevel has moved points out of position...most tools will have some kind of side effect...you might decide to fix it or not, it's up to you.
Select the four points that make up a polygon and with the Info Panel open, copy the Y position from # 3 point and then select all the points in the info panel and paste the value. Do the same for the points of the other two polygons.
 Looking from the back viewport, we can see that the edges aren't straight here as well. Do the same as before, but this time we are dealing with the X position.
 We want the current strip to be the top of the object, so we add a negative value in Thickener's requester panel. Flip and merge points, then BandSaw the object to get sharper edges. Once the object is ready, it's time to use the Radial Array tool as shown.
 This is how it should be looking so far.
 Going back to the original mesh, select the center ring, copy and paste onto to a new layer. Use the Thickener tool again. I'm using the default value, but we'll be resizing it in the next step.
This is the fun part, we'll use the Move Plus tool to do all the resizing. I love this tool and use it all the time. Select the outside loop and with Move Plus tool active, right click and drag until you're happy with the new size. Do the same to the inner loop, it might take a bit of fine tuning but once you get used to using this tool, you'll never look back :)
 BandSaw the front and back of the ring and you're done.
 Repeat the process for the other the two smaller rings.


Comments